OTTOLENGHI’S CHOCOLATE KRANTZ CAKE

23 October 2013

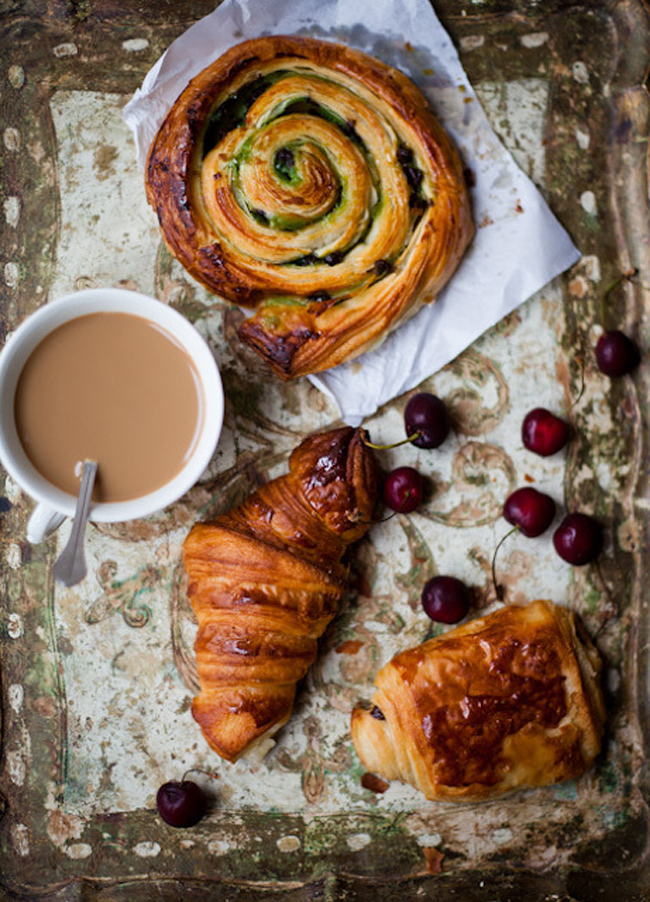
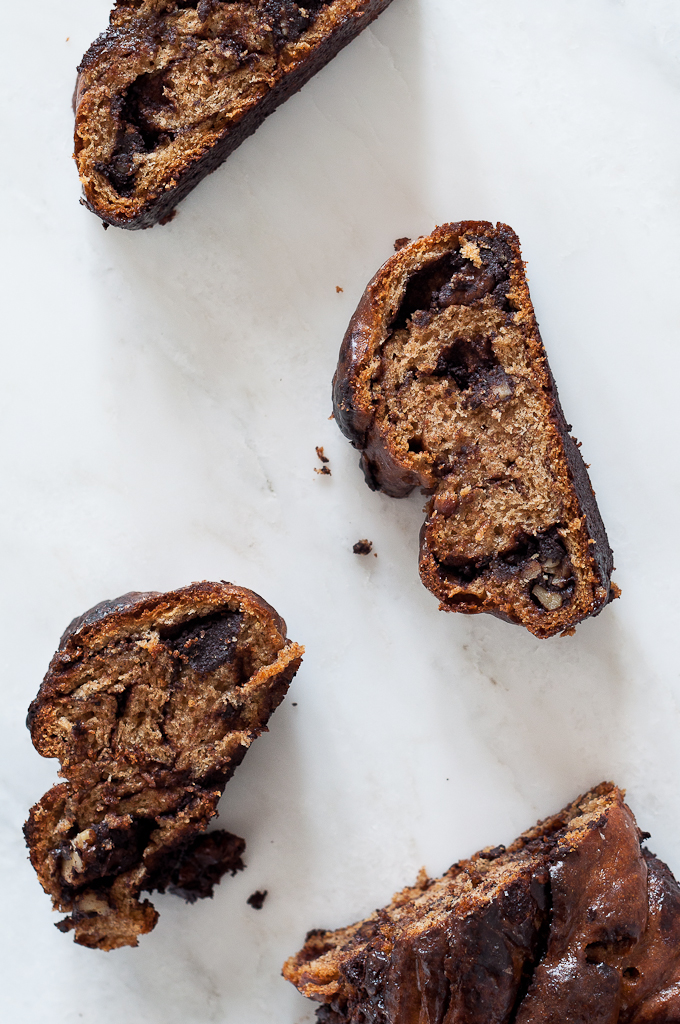
Thanks to the fabulous Italian photographer Valeria Necchio I soooo want to make this Chocolate Krantz Cake by Yotam Ottolenghi which fits right in my MOODY WEEK with it’s dark chocolate core.

She’s one of the best food photographers (and chefs!) around and I adore her modern take on food photography. Her blog Live Love Food is a favourite of mine and her featured recipes are always inspiring. How can you not love a girl who says:

I love eating and at the same time I like feeling good. So, I found my balance in seasonal, local food and healthy cooking with high quality key ingredients…

By her own admission she was a bit wary of making this cake which comes with a gentle warning of ‘it isn’t easy or quick’ by Yotam himself but going through the process she had a great time and the cake plus her freestyle left-over buns turned out perfectly – just like her photos.

Below is the recipe from Jerusalem by Yotam Ottolenghi & Sami Tamimi via Tara O’Brady’s blog Seven Spoons.

copyright-Valeria-Necchio-Chocolate-Krantz-Cake-01

copyright-Valeria-Necchio-Chocolate-Krantz-Cake-02

copyright-Valeria-Necchio-Chocolate-Krantz-Cake-05

copyright-Valeria-Necchio-Chocolate-Krantz-Cake-03

copyright Valeria Necchio Chocolate Krantz Cake

CHOCOLATE KRANTZ CAKE (AND FREESTYLE LEFT-OVER BUNS)

[Extract from the book]

Making a krantz isn’t easy or quick. You need to let the dough rise overnight and then fill and shape it, which is quite an elaborate process. But […] it is well worth it! […] They are just the sort of thing everyone hurls themselves at as soon as they come out of the oven. They will also keep for up to two days at room temperature, wrapped in foil, and up to a couple of weeks when frozen. For a fabulous alternative to the chocolate filling, brush each dough half with 6 tbsp / 80 g melted unsalted butter and then sprinkle with 1⁄2 cup / 120 g light muscovado sugar, 1 1⁄2 tbsp ground cinnamon, and scant 1⁄2 cup / 50 g coarsely chopped walnuts; then roll as described in the chocolate version.

Makes 2 loaves

INGREDIENTS:

For the dough:
4 cups / 530 g all-purpose flour, plus extra for dusting
1/2 cup / 100 g superfine sugar
2 teaspoons fast-rising active dry yeast
grated zest of 1 small lemon
3 extra-large free-range eggs
1/2 cup / 120 ml water
rounded 1/4 teaspoon salt
2/3cup / 150 g unsalted butter, at room temperature, cut into 3/4-inch / 2cm cubes
sunflower oil, for greasing

For the chocolate filling:
scant 1/2 cup / 50 g confectioners’ sugar
1/3 cup / 30 g best-quality cocoa powder
4 oz / 130 g good-quality dark chocolate, melted
1/2 cup / 120 g unsalted butter, melted
1 cup / 100 g pecans, coarsely chopped
2 tablespoons superfine sugar

For the sugar syrup (enough for both cakes):
2/3 cup / 160 ml water
1 1/4 cups / 260 g superfine sugar

DIRECTIONS:

For the dough, place the flour, sugar, yeast, and lemon zest in a stand mixer fitted with the dough hook and mix on low speed for 1 minute. Add the eggs and water and mix on low speed for a few seconds, then increase the speed to medium and mix for 3 minutes, until the dough comes together.

Add the salt and then start adding the butter, a few cubes at a time, mixing until it is incorporated into the dough. Continue mixing for about 10 minutes on medium speed, until the dough is completely smooth, elastic, and shiny. During the mixing, you will need to scrape down the sides of the bowl a few times and throw a small amount of flour onto the sides so that all of the dough leaves them. Place the dough in a large bowl brushed with sunflower oil, cover with plastic wrap, and leave in the fridge for at least half a day, preferably overnight.

Grease two 2 1⁄4-lb / 1kg loaf pans (9 by 4 inches / 23 by 10 cm) with some sunflower oil and line the bottom of each pan with a piece of waxed paper. Divide the dough in half and keep one-half covered in the fridge.

Make the filling by mixing together the confectioners’ sugar, cocoa powder, chocolate, and butter. You will get a spreadable paste. Roll out the dough on a lightly floured surface into a rectangle measuring 15 by 11 inches (38 by 28 cm). Trim the sides** to make them even, then position the dough so that a long side is closest to you. Use an offset spatula to spread half the chocolate mixture over the rectangle, leaving a 3⁄4-inch / 2cm border all around. Sprinkle half the pecans on top of the chocolate, then sprinkle over half the superfine sugar.

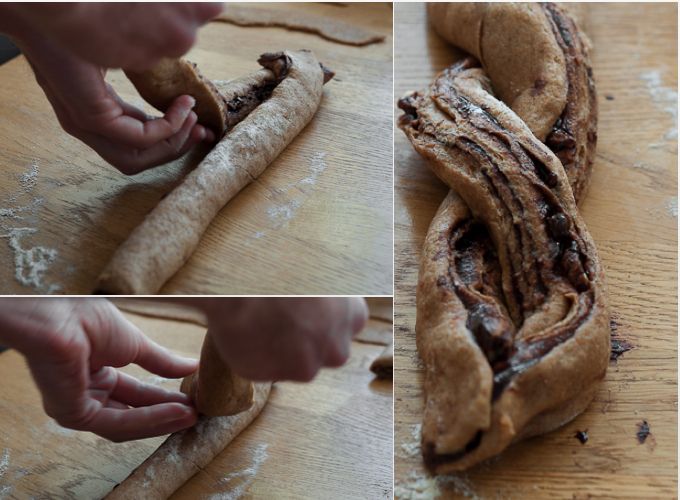
Brush a little bit of water along the long end farthest away from you. Use both hands to roll up the rectangle like a roulade, starting from the long side that is closest to you and ending at the other long end. Press to seal the dampened end onto the roulade and then use both hands to even out the roll into a perfect thick cigar. Rest the cigar on its seam. Trim about 3⁄4 inch / 2 cm off both ends of the roulade with a serrated knife. Now use the knife to gently cut the roll into half lengthwise, starting at the top and finishing at the seam. You are essentially dividing the log into two long even halves, with the layers of dough and filling visible along the length of both halves. With the cut sides facing up, gently press together one end of each half, and then lift the right half over the left half. Repeat this process, but this time lift the left half over the right, to create a simple, two-pronged plait. Gently squeeze together the other ends so that you are left with the two halves, intertwined, showing the filling on top. Carefully lift the cake into a loaf pan.

Cover the pan with a wet tea towel and leave to rise in a warm place for 1 to 1 and 1⁄2 hours. The cake will rise by 10 to 20 percent. Repeat the whole process to make the second cake.

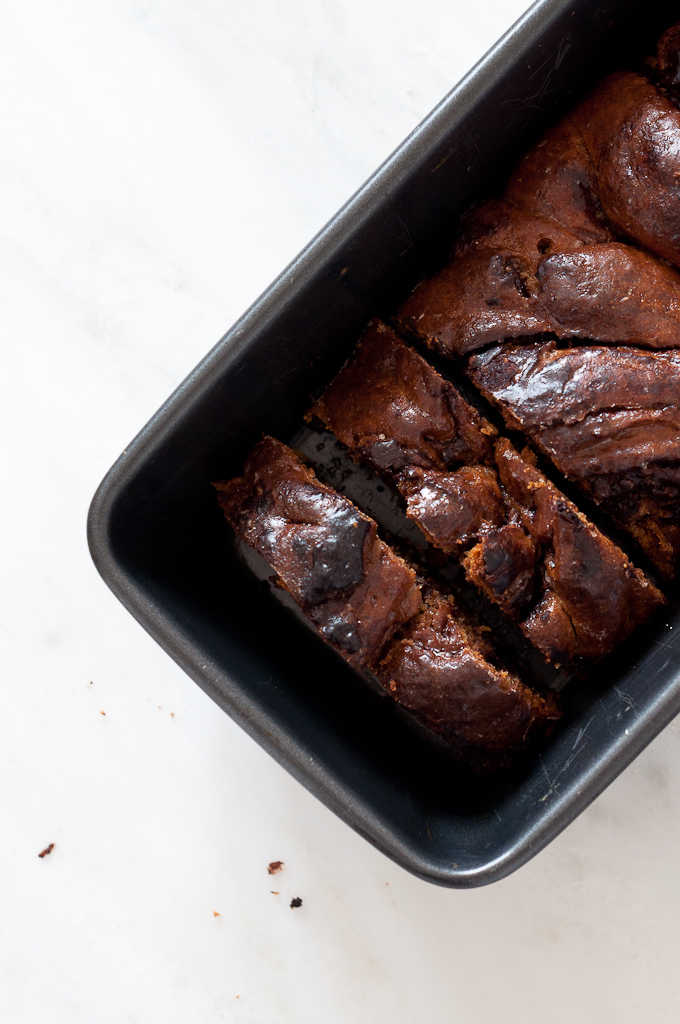
Preheat the oven to 375°F / 190°C, making sure you allow plenty of time for it to heat fully before the cakes have finished rising. Remove the tea towels, place the cakes on the middle rack of the oven, and bake for about 30 minutes, until a skewer inserted in the center comes out clean.

While the cakes are in the oven, make the syrup. Combine the water and sugar in a saucepan, place over medium heat, and bring to a boil. As soon as the sugar dissolves, remove from the heat and leave to cool down. As soon as the cakes come out of the oven, brush all of the syrup over them. It is important to use up all the syrup. Leave the cakes until they are just warm, then remove them from the pans and let cool completely before serving.

* Notes from Tara O’Brady:
• I used 100% regular wholemeal flour instead of the all-purpose/plain flour and it worked perfectly fine.
• Instead of superfine sugar, I used demerara caster sugar, also with good results.
• I didn’t have any lemons when I made these so I used 1 tsp pure vanilla extract in its place.
• I used large rather than extra-large eggs and they were OK.
• Since I don’t keep sunflower oil in the house, I used ghee – which worked well for the task.
• I like very dark chocolate, so I used 85% dark chocolate – in my humble opinion, it made a great contrast with the sweetness of the syrup and balanced things out wonderfully.
• I swapped pecans for walnuts. I am sure hazelnuts would be fantastic, too.
• I ended up using less syrup (about 2/3 of the total). Although the author heatedly suggests to use all the syrup, I am not fond of super-sugary stuff, so I think I will use even less next time. I think you should listen to whatever your sweet tooth tells you…

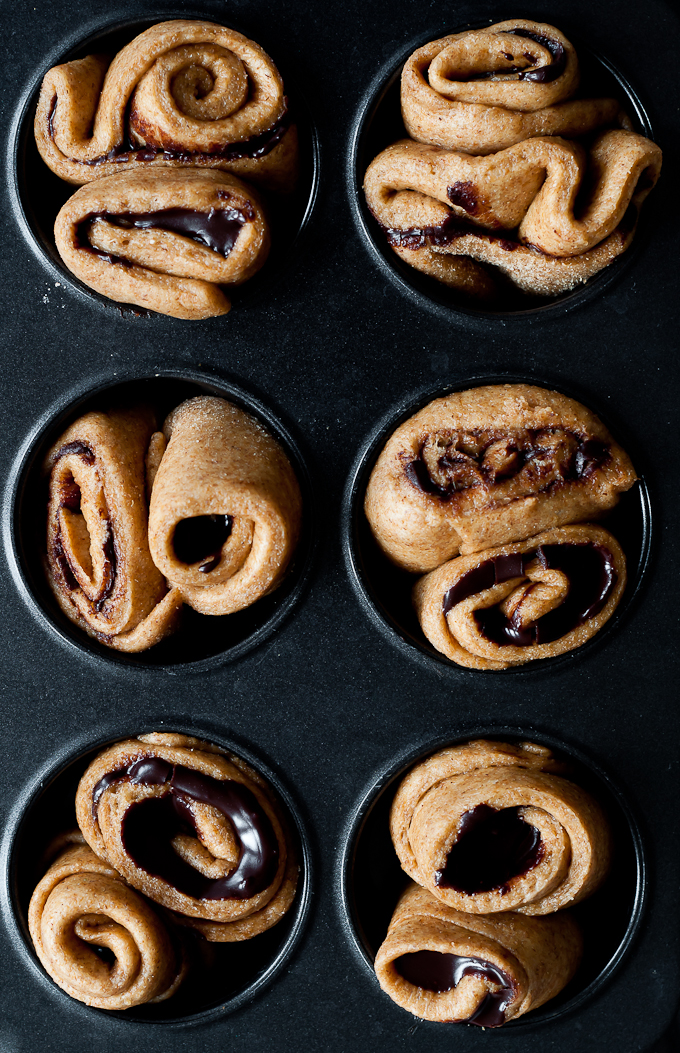
** Notes from Valeria Necchio:
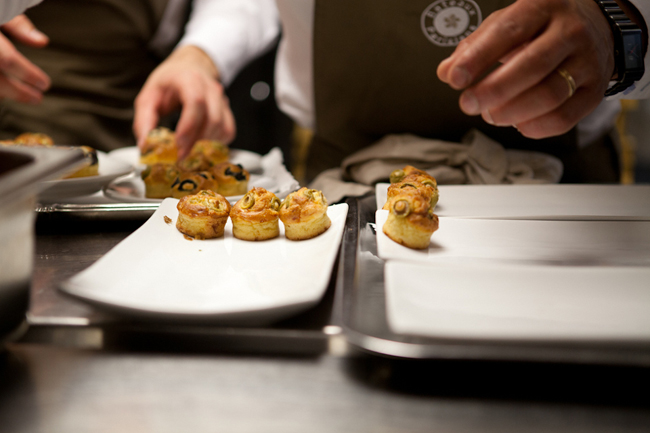
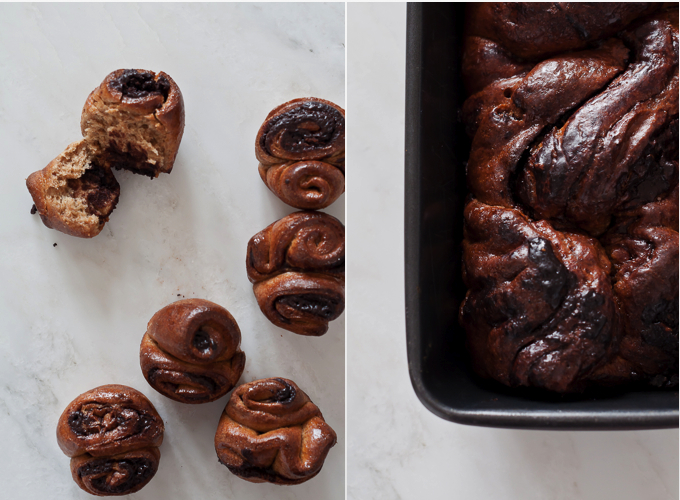
• I used the scrapes of dough and a bit of leftover chocolate filling to make those little rolled buns (pictured above), which I baked in a muffin tin for less than half the amount of time it took to bake the loaves. They were delicious and totally moreish. I will try to make cinnamon buns out of this recipe sometime soon – as I think the results might be overwhelmingly good.

Enjoy and I hope you’re inspired!

Annie Signature Stylejuicer

Photography | Valeria Necchio
Recipe | Yotam Ottolenghi
Notes | Seven Spoons & Valeria Necchio

GOTHIC OFFICE BY JESSICA HELGERSON INTERIOR DESIGN

22 October 2013

I’m in the mood for something different this week! So I’ve decided to have a MOODY WEEK here on Stylejuicer, matching the weather (not my mood) and leading up to SPOOKY HALLOWEEN next week. Be prepared for dark, sumptuous and tactile interiors, design and photography. It’s going to be a feast for the senses!

Regular readers will know that I’ve got a soft spot for Jessica Helgerson and her team of interior designers. I just LOVE their work and have featured their successful remodelling and interior design of a 100 year old family home in back in August.

copyright Jessica Helgerson Interior Design

Today I want to make your heart skip a beat by introducing the transformation of a private office space in a 1870s Gothic revival building in downtown Portland, USA.

Jessica and her team initially presented designs ranging from clean, modern and bright to dark, moody and luxurious. To their delight the client decided against the current trend and preferred the dark and luxurious route which was more in keeping with the historic building.

After gutting the space and removing angled walls that created small cramped rooms they divided the space into lobby, conference room, open-plan office with two private glass cube offices and a lounge area.

To break up the open-plan office space and to fulfill the client’s brief of a ‘feeling of separation’ they commissioned Portland based glass artist Andy Paiko who designed a glass sculpture that divides the space in an elegant and playful way without closing it off too much.

As with all her projects Jessica and her team are masters at adding interest and texture with bespoke coffered ceiling patterns, luxurious wall paper in rich abstracted botanical patterns and cabinetry that cleverly hides storage and a kitchenette. However, my favourite detail is the exposed brickwork which works as a juxtaposition to all the refinery and sumptuous fabrics.

copyright-Jessica-Helgerson-Interior-Design-03

You can tell how much fun they had when they managed to stage a photoshoot with antique telephones and typewriters to create a glamorous, dark and moody office where it’s ok to read novels and drink whiskey at work. A perfect backdrop for Don Draper and team and a way of ‘working’ which continued well into the 70s.

copyright-Jessica-Helgerson-Interior-Design-04

copyright-Jessica-Helgerson-Interior-Design-13

copyright-Jessica-Helgerson-Interior-Design-06

copyright-Jessica-Helgerson-Interior-Design-07

copyright-Jessica-Helgerson-Interior-Design-09

copyright-Jessica-Helgerson-Interior-Design-11

copyright Jessica Helgerson Interior Design

Enjoy and I hope you’re inspired!

Annie Signature Stylejuicer

More information | Jessica Helgerson Interior Design
Photography | Lincoln Barbour

SMALL SPACES: STUDENT APARTMENT IN PARIS

17 October 2013

This charming student apartment in Paris’s ninth arrondissement might only be 25m2 but it is packed with practical storage solutions and a cleverly zoned layout thanks to the addition of a centrally located kitchen that divides but doesn’t obstruct.

SmallSpaces-StudentAptm-Paris-via-Stylejuicer-06

I found this little gem AGES ago on Architectural Digest Russia and knew it would be perfect for my PARIS week. As Anne Ditmeyer of Pret A Voyager will testify, apartments are teeny tiny in Paris and a lot of them share bathroom and laundry facilities. Anne refers to her first abode lovingly as a cupboard as it was only 12m2, and I’m sure will consider this student accommodation a palace. Well, it helps if your mother is an interior designer.

Robin, the lucky owner and student, gave his mother a clear brief: A contemporary space that combined period features with his modern needs as a student. It was important for his mother Marianne to differentiate the ‘work and play’ areas which she achieved by installing a kitchen in the centre of the apartment. I love it’s open plan breakfast bar to one side whilst large glass panels on either side contain the space but let light flood through the apartment.

The quirky antique touches like the stove, gilt mirror and old suitcases that double up as a coffee table act as a reminder of the building’s history and blend well with the old floorboards and coving. Marianne chose a sensitive colour scheme with a dominant French Gray (I’m referring to Farrow & Ball here) broken up by soft blue for the fireplace alcove and a dusty purple behind the mirror in the sitting area. The scheme is contemporary but classy and fits right into this period place. Every nook and cranny has got it’s use with lots of shelving and storage built in so it feels like a generous space – unless it’s exam time and I suspect most surfaces will be filled with papers.

SmallSpaces-StudentAptm-Paris-via-Stylejuicer-01

SmallSpaces-StudentAptm-Paris-via-Stylejuicer-04

SmallSpaces-StudentAptm-Paris-via-Stylejuicer-03

SmallSpaces-StudentAptm-Paris-via-Stylejuicer-05

SmallSpaces-StudentAptm-Paris-via-Stylejuicer-02

SmallSpaces-StudentAptm-Paris-via-Stylejuicer-08

Small Spaces Student Apartment in Paris via Stylejuicer

SmallSpaces-StudentAptm-Paris-via-Stylejuicer-09

Enjoy and I hope you’re inspired!

Annie Signature Stylejuicer

More information | AD Russia
Photography | Stephan Julliard

ALL YOU NEED TO KNOW ABOUT PARIS BY ANNE DITMEYER

16 October 2013

Dear readers, today I’d like to inspire you with the wonderful universe that is Paris. After getting you excited with some juicy photography by Leela Cyd yesterday I’d like to introduce you to Anne Ditmeyer, the author of Pret A Voyager, contributing editor for Design*Sponge and the ultimate source for everything you need to know about Paris and France.

Anne loves to travel and is a swiss-army knife of a talent. She writes, blogs, designs, teaches, consults and gives guided tours around Paris. She started her blog on Bastille Day in 2007 as a creative outlet to explore the intersection of travel and design and you can read about her experiences from the mundane to the quirky, sometimes even extravagant.

As an American in Paris she has explored every corner of this city and I love the fact that she gives guided tours with a difference. If you’re a bit of a film buff you’ll be excited to hear that there’s an Amelie tour which explores key sites of the movie with lots of discussion of the film’s stylistic means. If you ask nicely Anne will even bring her gnome along. I’m sure to book a Design Tour with her next time I visit the city of love.

Her site is extensive but with Anne’s help I’ve picked some favourites for you below. Happy exploring and don’t forget to write me a postcard!

Anne-Ditmeyer-Paris-Sleep-by-Stylejuicer

From frugal to fancy, a list of favourite places to sleep, all with great personality and a sense of style.

French-Flag-icon TIP: Anne recommends to rent an apartment to get a real sense of the city and to get to know the neighbourhood as well as how other nationalities live. I’ve done this myself and couldn’t agree more!

Anne-Ditmeyer-Paris-Sleep-by-Stylejuicer

This is a budget friendly guide to Anne’s favourite places in Paris, handily divided by arrondissement. From sights, museums and gardens to markets, bakeries, shops, bars, cafes and restaurants.

French-Flag-icon TIP: Picnic on the Champs de Mars when the Eiffel Tower twinkles every hour at night.

Anne-Ditmeyer-Paris-Sleep-by-Stylejuicer
With the help of some friends Anne has compiled a comprehensive guide to having a great time on a budget. Be it for city dwellers or visitors.

French-Flag-icon TIP: Go to your local outdoor market rather than the grocery store for fresh produce. Not only is it better, but it’s also cheaper.There are tons of markets around the city, so go explore.

Enjoy and I hope you’re inspired!

Annie Signature Stylejuicer

HUGE thanks to Anne for letting me share her fabulous work and I’ll see you in Paris. 😉

More information | Anne Stark Ditmeyer
Anne’s blog | Pret A Voyager
Featured photo | by Cartier Bresson

CITY CRUSH: PARIS BY LEELA CYD

15 October 2013

Hands up who’s in love with Paris? Well, that’s nearly all of you which makes me think it’s about time Stylejuicer brought you some Paris love.

I have to confess that although I only live two and a bit Eurostar-hours away, I’ve not been for… phew, must be 10 years by now. Shameful, I know but I’ve found you just the right person to quench your thirst for Paris:
Leela Cyd! An American travel, food and lifestyle photographer who took a trip not too long ago perfectly capturing everybody’s favourite city.

copyright-LeelaCyd-Paris-via-Stylejuicer-16

In her own words Leela was raised around a table full of artists and writers, about a block from the Pacific Ocean. So far so dreamy but wait, it gets better. Her home is in Santa Barbara, AND she gets to travel around the world for her assignments! Now, that’s what a I call a great set-up.

Today’s photo series features a mix of quintessential Parisian interiors and exteriors, culinary delights and of course the Eiffel Tower. My personal favourite is the very cute and very French apartment with it’s girlie details, white-washed beams, soft colours and beautiful upholstery. Isn’t that a bed you’d never want to get out of!?

Leela is also an incredibly entertaining writer and her food and travel blog Tea Cup Tea is a favourite of mine as well as having been awarded Saveur’s ‘Sites We Love’ last year. As the blog name suggests she loves a good cup of tea and meets friends, artists and like minded people around the world to have a chat and share a cuppa. One of which is fellow American and Paris-resident Anne Ditmeyer of Pret A Voyager who will tell you all you need to know about Paris on the blog tomorrow with some more wanderlust-inducing images.

For now, dive in to Leela’s photo story and I dare you not to buy a croissant on the way home.

PS: Leela, you can pop in for a cuppa any day!

copyright-LeelaCyd-Paris-via-Stylejuicer-23

copyright-LeelaCyd-Paris-via-Stylejuicer-24

copyright-LeelaCyd-Paris-via-Stylejuicer-26

copyright-LeelaCyd-Paris-via-Stylejuicer-29

copyright-LeelaCyd-Paris-via-Stylejuicer-09

copyright-LeelaCyd-Paris-via-Stylejuicer-10

copyright-LeelaCyd-Paris-via-Stylejuicer-07

copyright-LeelaCyd-Paris-via-Stylejuicer-14

copyright-LeelaCyd-Paris-via-Stylejuicer-20

copyright-LeelaCyd-Paris-via-Stylejuicer-21

copyright-LeelaCyd-Paris-via-Stylejuicer-13

copyright-LeelaCyd-Paris-via-Stylejuicer-18

copyright-LeelaCyd-Paris-via-Stylejuicer-11

copyright-LeelaCyd-Paris-via-Stylejuicer-17

copyright-LeelaCyd-Paris-via-Stylejuicer-05

copyright-LeelaCyd-Paris-via-Stylejuicer-02

copyright-LeelaCyd-Paris-via-Stylejuicer-30

copyright-LeelaCyd-Paris-via-Stylejuicer-06

copyright-LeelaCyd-Paris-via-Stylejuicer-01

copyright Leela Cyd via Stylejuicer

Enjoy and I hope you’re inspired!

Annie Signature Stylejuicer

More information & photography | Leela Cyd
Leela’s blog | Tea Cup Tea